My external hard drive suddenly stopped mounting on my Mac, and it has important files I can’t afford to lose. Disk Utility sees it, but I can’t access the data, and I’m trying to find safe ways to recover the drive without formatting or erasing anything. Has anyone dealt with a hard drive not mounting on Mac and recovered their files successfully?
I stopped treating an unmounted external drive on a Mac like an automatic death sentence. Too many times, the disk looked bad on the surface, yet the problem came down to a damaged file system. I’d see the device in Disk Utility, the LED would blink like normal, and the size looked close to what it should be. macOS still refused to mount it.
Before I touch repairs, I rule out the dumb stuff first.
Swap the cable. Plug the drive straight into the Mac. Skip the hub. Try another USB or Thunderbolt port.
Check Finder settings and make sure external disks aren’t hidden from view. If the drive shows up in Disk Utility and the reported capacity looks about right, I take that as a decent sign. The Mac is still talking to the hardware.
Then comes the part people rush past. If the files matter, stop trying to “fix” the disk first. Get the data off it.
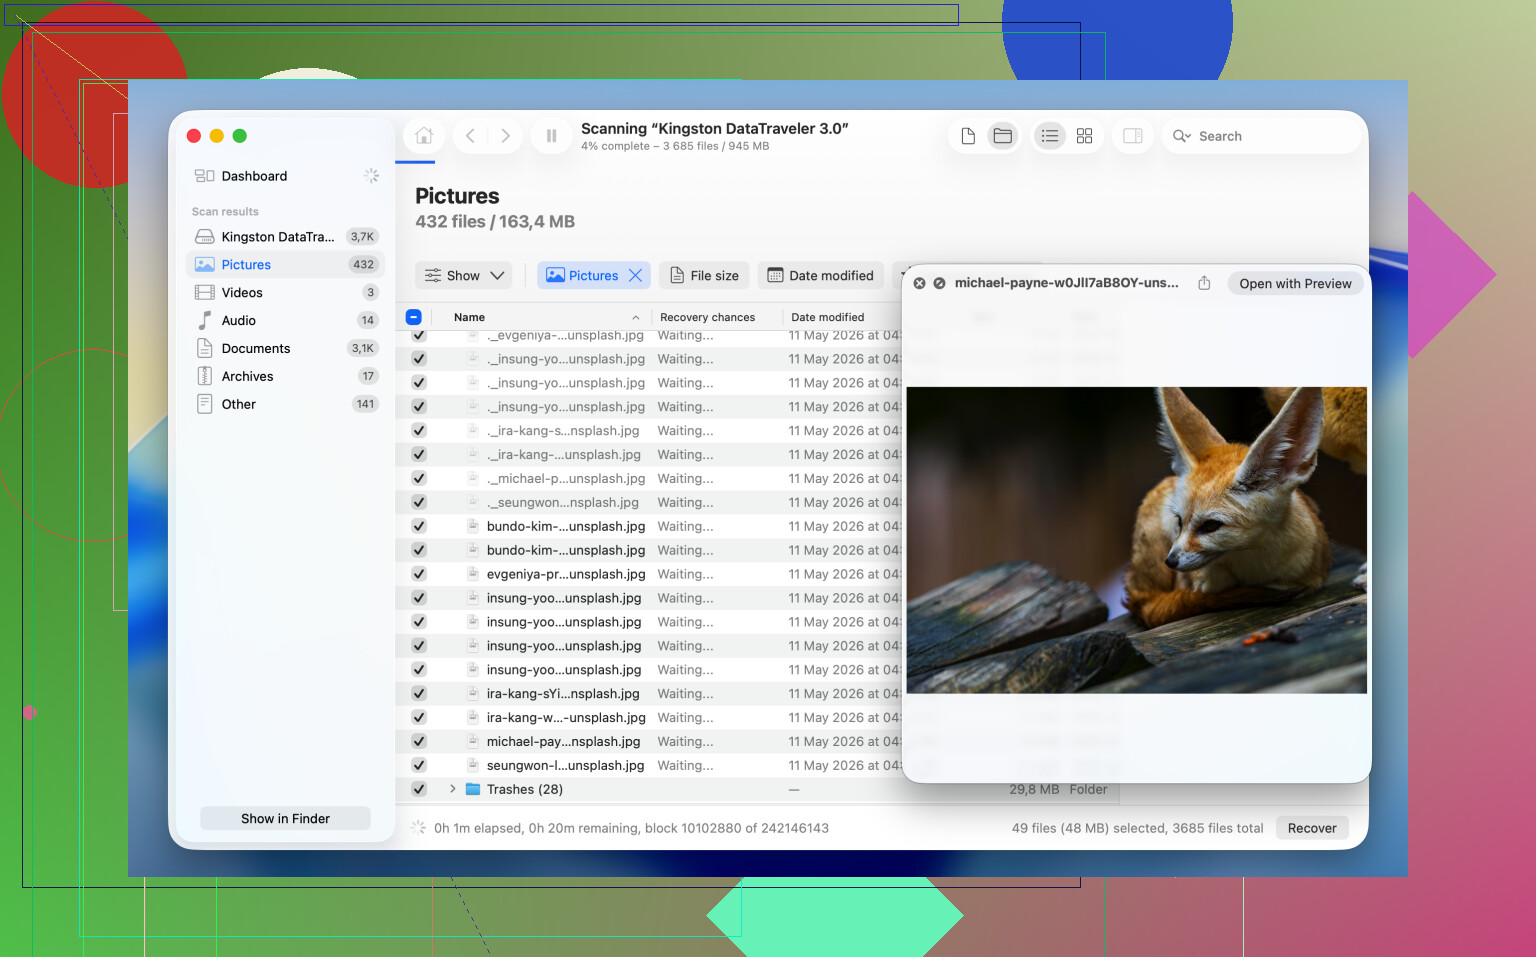
What worked for me more than once was Disk Drill. It reads the storage device directly, so in some cases it pulls files even when macOS won’t mount the volume at all.
If your files are worth keeping, I’d do it in this order:
1. Install and open Disk Drill.
2. Find the unmounted drive in the device list.
3. Make a Byte-to-byte Backup first if the drive feels unstable, drops out, or behaves weird.
4. Scan the original disk or the backup image.
5. Look through what the app finds.
6. Preview the files you care about and check if they open.
7. Recover them to a different drive.
After your data is safe somewhere else, you’ve got room to mess with the original disk without sweating every click.
If you don’t care about the old contents and only want the drive usable again, formatting is often the shortest path.
Reformat the Drive
Formatting rebuilds the file system. It does not bring your old files back. What it often does is clear the mount issue fast.
1. Open Disk Utility.
2. Click View > Show All Devices.
3. Pick the physical disk, not the volume listed under it.
4. Click Erase.
5. Type a name.
6. Pick APFS if the drive stays in the Mac ecosystem.
7. Pick exFAT if you move between macOS and Windows.
8. Click Erase and wait.
9. Unplug the drive, then connect it again.
If it mounts after this, I’d put my money on file system damage, not failed hardware.
If you want one last shot before wiping it, there are a few things worth trying. I’ve had mixed results. Sometimes one of them works in two minutes. Other times, nope.
Method 1: Run First Aid on the Physical Disk
I’ve seen cases where the issue was higher up in the disk structure, not inside the volume itself.
1. Open Disk Utility.
2. Click View > Show All Devices.
3. Select the top-level physical disk.
4. Click First Aid.
5. Approve the repair prompt.
6. Let it finish.
7. Try mounting the drive again.
If the corruption is minor, First Aid sometimes cleans it up enough for the volume to come back.
Method 2: Kill a Hung fsck Process
I ran into this a few times on drives which looked fine but stayed unmounted because macOS got stuck doing a background check.
1. Open Terminal.
2. Run: sudo pkill -f fsck
3. Press Return.
4. Enter your admin password if macOS asks.
5. Wait a few seconds.
6. See whether the drive mounts on its own.
This step doesn’t repair damage. It stops a stuck file system check which might be blocking the mount process. Small difference, but it matters.
Method 3: Mount It Manually in Terminal
Disk Utility fails sometimes. Terminal has bailed me out more than once.
1. Open Terminal.
2. Run diskutil list
3. Find your disk identifier, something like disk4s1.
4. Run diskutil mount /dev/disk4s1
5. Replace disk4s1 with your own identifier.
6. Press Return.
7. Read the error output if it fails.
When this works, the volume mounts right away. When it doesn’t, Terminal usually gives a more useful clue than Disk Utility does. Not always, but often enough.
Last thing, all of this assumes the drive hardware still behaves normally. If the disk doesn’t show in Disk Utility, reports a wildly wrong size, clicks, disconnects over and over, or won’t spin up or power on, I’d stop treating it like a mount issue. At that point it looks more like hardware failure. Software repair attempts tend to waste time there, and in some cases they make later recovery harder. I learned that one the annoyng way.
1 Like
If Disk Utility sees the drive, I would avoid repair writes first. I agree with part of what @mikeappsreviewer said, but I’m less eager to run fixes on the original disk before checking its health. A dying drive often gets worse from repeated read and repair attempts.
Do this first.
- Check SMART status in Disk Utility, if it shows for the physical drive. If it says Failing or Not Supported on a flaky USB bridge, treat the disk as unstable.
- Open Terminal and run diskutil info /dev/diskX, replace X with your disk number. Look for:
Device Block Size
Read-Only Media
Total Size
File System Personality
S.M.A.R.T. status - If the reported size is wrong, stop. That points to hardware or bridge trouble.
- If the size is correct, clone it before poking at it more. On Mac, ddrescue is safer than repeated Finder or First Aid attempts because it skips bad areas and logs progress. Recover from the clone, not the source.
If you want files, Disk Drill is still one of the better Mac-friendly options after imaging. Scan the clone or disk image, not the failing drive if possble.
One more thing people miss. Try removing the drive from its enclosure if it’s a desktop HDD or SATA SSD in a USB case. A bad USB bridge board fails way more often than the disk itself. Put it in another enclosure or adapter and test again.
For extra reading, this thread has more tips for fixing an external hard drive that won’t mount on a Mac: how to fix an external drive that won’t mount on macOS
If the drive clicks, spins down, disappears, or freezes Disk Utility, skip software. Go to a lab. That saves time and data.
If Disk Utility sees the drive, I would also check whether the volume is just not auto-mounting because of ownership or mountpoint weirdness, not only corruption. That part gets overlooked a lot.
A couple things I’d try that are different from what @mikeappsreviewer and @suenodelbosque already covered:
- In Terminal, run
log show --last 10m | grep -i diskarbitrationright after plugging it in. macOS sometimes tells you why it refused the mount, and the message is way more useful than Disk Utility’s vague nonsense. - Try mounting it read-only if possible. Less risk, less drama. You can test from Terminal with
diskutil mount readOnly /dev/diskXsYon supported filesystems. - If it’s an old HFS+ drive, test on another Mac if you can. I’ve seen newer macOS versions get weird with damaged legacy volumes that an older Mac mounted just enough to copy data off.
- If the drive is encrypted, check whether the issue is actually with unlocking, not mounting. FileVault, APFS encryption, and some third-party encrypted disks can appear present but unusable.
I slightly disagree with the “run First Aid early” crowd. On a drive with irreplaceable files, I prefer read-only attempts first, then recovery. If the disk stays stable and previews files, use Disk Drill to pull data to another drive before trying repairs. That’s usually the safer play.
Also worth checking in System Information under USB or Thunderbolt. If the enclosure identifies itself inconsistently between reconnects, the enclosure may be the real villain here. Seen that too many times, tbh.
If you want a visual walkthrough, this Mac external hard drive recovery video guide covers the methods pretty well.
If it starts clicking, stalls Finder, or makes the Mac beachball every time you touch it, stop messing with it. That’s where DIY turns into “well, that was a bad idea.”
One thing I’d add to what @suenodelbosque, @andarilhonoturno, and @mikeappsreviewer already covered: check whether the drive is failing to mount because macOS marked it “dirty” after an unsafe eject or power issue. In Terminal, diskutil apfs list or diskutil list can sometimes show a volume that exists fine structurally but just won’t attach normally.
I actually disagree a bit with trying too many mount attempts. If each retry spins the drive up, that can be extra wear on a borderline HDD. I’d give it one clean test on another Mac, ideally with a different cable and direct connection, then stop.
Also, look in Console.app for immediate disk errors right after plugging it in. You’ll often see I/O errors, bridge resets, or permission-related mount failures there.
If recovery is the goal, Disk Drill is reasonable after you confirm the disk is at least readable.
Pros of Disk Drill
- Easy Mac interface
- Good for unmounted but detectable drives
- Can preview recoverable files
- Useful if you scan an image instead of the original disk
Cons
- Not magic if the hardware is dying
- Deep scans can take forever
- Paid recovery features
- Less ideal than cloning first when the drive is unstable
My order would be: verify size, test another cable/enclosure, check logs, image if stable, then recover files with Disk Drill from the image. If the drive clicks or disconnects, skip DIY.