My hard drive suddenly stopped showing up, and it has important photos, work files, and personal documents I never backed up. I’m trying to figure out the safest first steps for hard drive data recovery without making things worse. Should I use recovery software, check for hardware issues, or go straight to a professional data recovery service?
I ran into this with an old external drive, and the first thing I did wrong was keep using it like nothing happened. Don’t do that. If files vanished, the bits are often still sitting there until new data lands on top of them. Every copy, download, or install cuts into your odds.
A few boring checks are worth doing before you throw recovery tools at it. I’ve seen files turn up in places people forgot to check:
- Recycle Bin
- OneDrive or Google Drive sync folders
- File History backups
- Other external backup drives
- A different user account on the same PC
If all of those come up empty, I’d move to recovery software for normal delete and format cases.
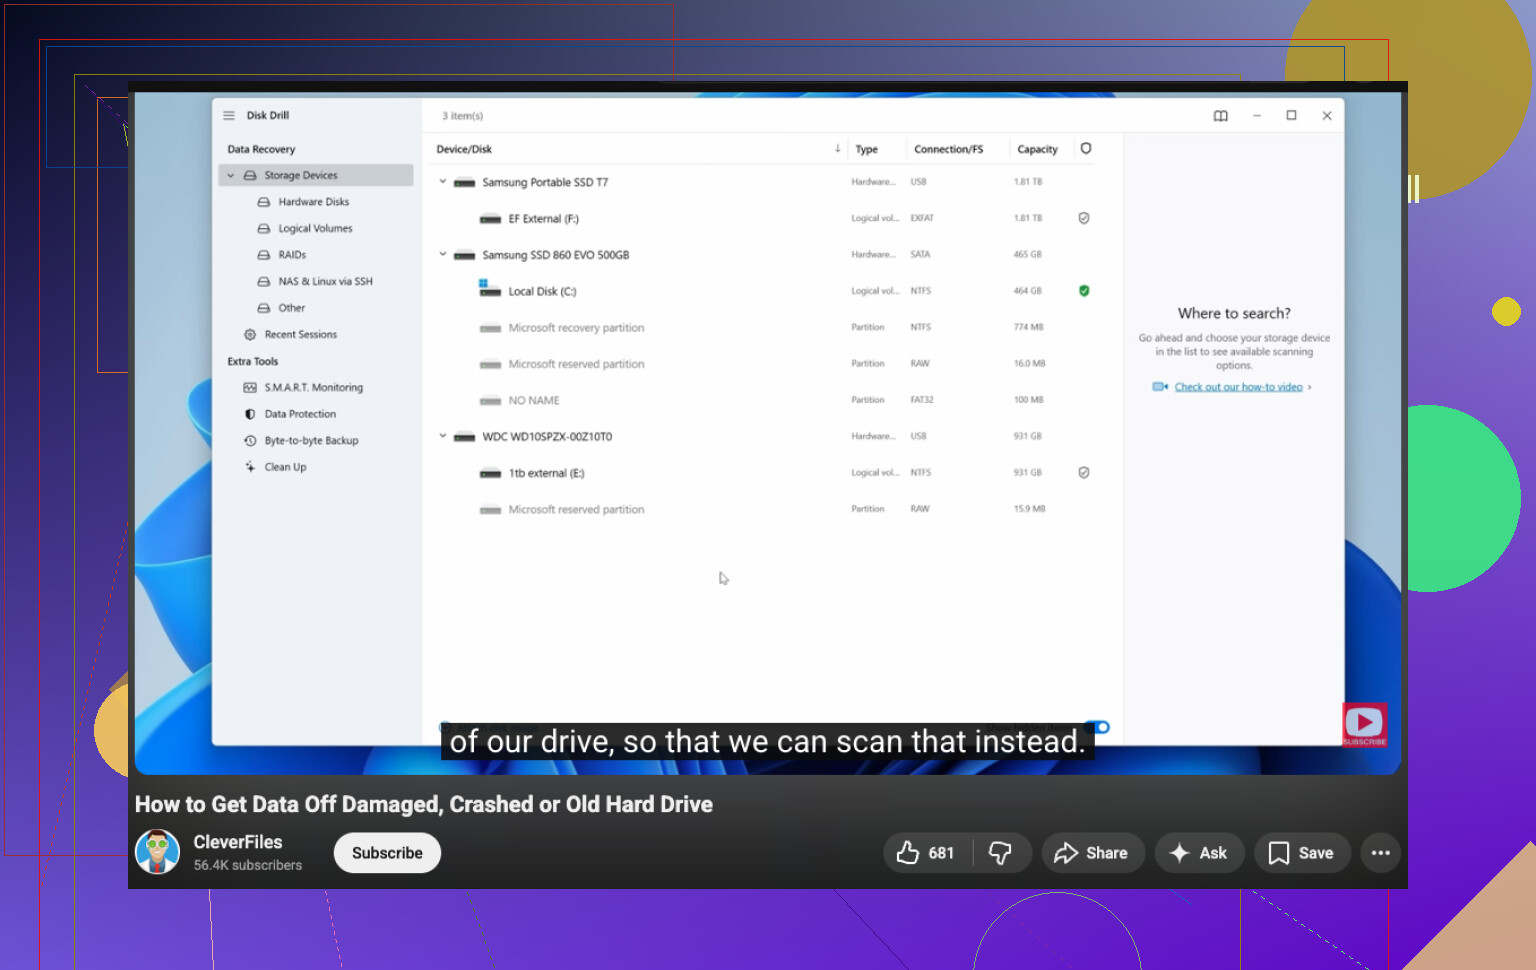
I’d start with Disk Drill. I used it because the layout is easy to follow, but it still digs through formatted drives, lost partitions, and messed up file systems without forcing you to learn a pile of low-level stuff first.
The way I handle it is simple:
- Plug in the drive and confirm the system still sees it
- Install the recovery app on a different disk, not the problem drive
- Run a full scan, skip the quick one
- Preview what it finds before restoring anything
- Pull back the files you care about most first
- Save recovered files to a different drive
That last step matters more than people think. Writing recovered files back onto the same HDD is a good way to wipe out data you hadn’t recovered yet. I learned this the hard way. Kinda brutal.
One thing I liked with Disk Drill was the preview. If a photo opens cleanly, or a video starts playing in preview, I take that as a decent sign the file isn’t trashed. I usually test a small batch first instead of trying to restore 300 GB in one shot and hoping for the best.
If it misses too much, try a second tool after. Different recovery engines pull up different results. PhotoRec is free and pulls off some wild saves, though the tradeoff is rough. It’s more technical, and filenames often come back mangled or gone. R-Studio and UFS Explorer are also good from what I saw, though they feel less friendly.
One hard stop. If the drive is clicking, grinding, dropping off randomly, or not showing up in BIOS, I would stop running scans at home. That points more toward hardware trouble, not a simple logical issue. Recovery software helps when the file system is damaged or files were deleted. It won’t fix a drive with failing internals.
At that stage, a recovery lab is the safer move, esp if the missing stuff includes family photos, work files, or anything you can’t replace. It costs a lot. Still, sometimes there isn’t another route.
1 Like
Stop powering it up over and over. That does more damage than most people think.
If the drive is silent and not showing up, start with connection checks first. New SATA or USB cable. Different port. Different power supply if it is an external desktop drive. Try another PC. I disagree a bit with @mikeappsreviewer on jumping into a full scan early. First I want to know if the problem is the drive, the adapter board, or the enclosure. A bad USB bridge kills detection all the time.
If it still shows in Disk Management but has no letter, do not format it. Do not run CHKDSK either. CHKDSK writes changes and sometimes trashes recoverable folder structure on a failing disk. People do this alot and regret it.
Best first move if the files matter, make a sector-by-sector image of the drive to a healthy disk. Use ddrescue on Linux if you know your way around tools. It reads around bad sectors and logs progress. Work from the clone or image, not the original. That gives you more tries if software recovery fails.
After you have an image, then use Disk Drill or another recovery app on the image file. Disk Drill is good for sorting photos, docs, and partitions without a huge learning curve. I’d recover the irreplaceable stuff first, photos and work docs, then deal with the rest.
If the drive clicks, spins down, smells burnt, or vanishes mid-read, stop. Home recovery gets risky fast.
For search terms, think ‘recover data from an old hard drive safely’ or ‘how to recover files from a failed hard drive without data loss.’
This video is a decent primer on first steps, watch this failed hard drive recovery walkthrough.
Stop plugging it in over and over just to “see if it comes back.” That’s how people turn a recoverable drive into a paperweight.
I agree with @vrijheidsvogel on one big thing: if the data actually matters, your first real goal is preservation, not recovery. Slight disagreement though, I would not tell most people to jump straight into Linux imaging tools unless they’re comfortable with them, becuase one wrong command can get ugly fast.
What I’d do first:
- Listen to the drive
- clicking, grinding, repeated spin-up/spin-down = stop
- burnt smell = stop
- disappears after a few seconds = stop
- Check whether it appears in BIOS/UEFI or Disk Management
- if BIOS can’t see it, that’s a worse sign than just “no drive letter”
- If it is detected, clone/image it before experimenting if possible
- Then run recovery on the clone, not the original
For software-side recovery, Disk Drill is a solid choice because it’s easy enough for normal people and handles lost partitions and damaged file systems pretty well. I’d use it on the image or clone first, then sort by file type and recover the irreplaceable stuff before the giant random folders.
Also, don’t freeze the drive. Don’t smack it. Don’t run CHKDSK “just to test.” Internet folklore has killed a lot of data, lol.
If you want another discussion on recovery tools, this thread is worth a skim:
best hard drive recovery software recommendations from Reddit
@mikeappsreviewer is right about not writing anything new to the disk. That part is non-negotiable. But if the drive is making physical distress noises, skip home recovery and call a lab. Expensive, yes. Still cheaper than losing years of photos forever.
What I’d add to what @vrijheidsvogel, @reveurdenuit, and @mikeappsreviewer already covered is this: classify the failure before you touch recovery software.
If the drive spins normally, shows the correct size, and stays connected, that smells more like a logical failure. If capacity is wrong, SMART is unreadable, transfer speed crawls, or it disconnects under load, treat it like degrading hardware even if it still “appears.” That distinction matters because long scans can be the thing that finishes it off.
One small disagreement with the “try everything cable-related” approach: if this is a bare internal drive and the data is truly priceless, I would limit repeated power cycles. A couple of controlled tests is reasonable. Ten is not.
My triage order:
- Check if the drive is detected with correct model and size.
- Read SMART data if possible, but only once and only with a non-writing tool.
- If SMART shows reallocated/pending sector problems or the drive stalls, stop testing.
- Decide: DIY image first, or pro lab immediately.
Another thing people forget is temperature and power stability. Bad USB hubs, weak laptop ports, and flaky external enclosures can make a healthy disk look dead. For 3.5-inch externals, the power brick is often the real villain.
If you do get to software recovery, Disk Drill makes sense after you have a clone or image. Pros: easy preview, simple workflow, good for photos/docs, less intimidating than forensic tools. Cons: not the deepest tool for severe corruption, scans can take forever, and it is not magic for failing hardware. I’d still keep alternatives in mind if results are thin.
Big picture: your first job is not “recover files.” It’s “avoid changing the patient.” That mindset saves more data than any app.